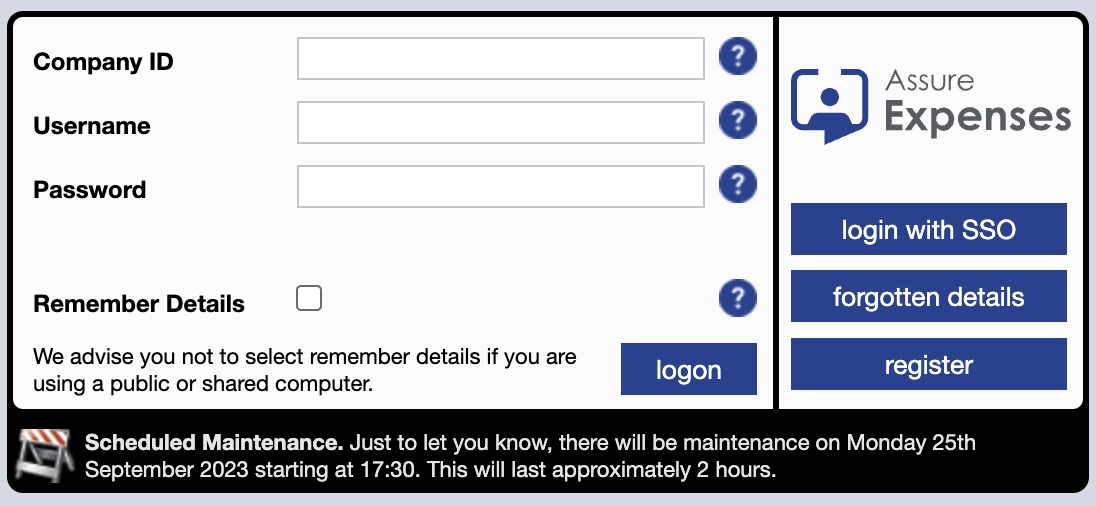
1) Login to Assure Expenses
Login to Assure Expenses using the username and password created when you first registered. If you haven’t yet registered on Assure, follow our guidance on self-registration.
If you have already got a username and password, enter the ‘Company ID’ of HEENON, then add your details and click the ‘logon’ button.
You will need to have added your bank account details before you can make a claim. If you haven’t yet done this, click on the guidance for self-registration below, and scroll down to number 9 for details on adding an account.
2) Add new expenses
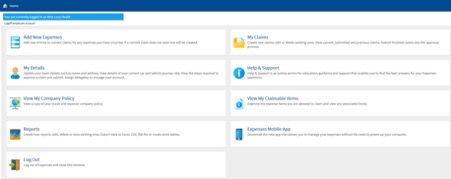
Click on the home icon to navigate to the screen below and click on ‘Add new expenses’.
The ‘Add expense’ screen will appear as below.
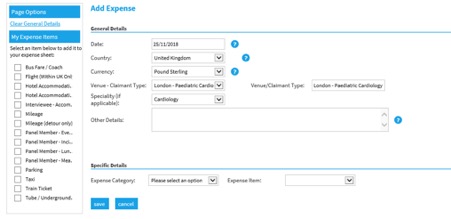
Enter the date of your claim; this must be the date of the event you are attending. On the left side of the screen under ‘Venue–Claimant Type’ select an option from the drop-down list. On the right side of the screen there is a second ‘Venue/Claimant Type’; the same information you have already selected will appear here, click on this text. You must make the ‘Venue–Claimant Type’ selection on the left first, otherwise the information on the right will not appear.
Although it is a long list, it appears in alphabetical order and is easy to sort through. All School activity is prefixed by NSHCS.
Under the ‘Speciality’ drop down list, select National School of Healthcare Science. In the ‘Other details’ box you can add any information which may be helpful to the claim approver. This will be helpful if you are making multiple claims.
To add expense items make a selection from the check boxes on the left. Each selection will then appear under the ‘Specific Details’ section for you to add further details.
3) Entering an expense item and receipt - hotel example
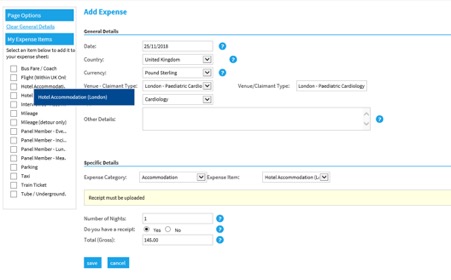
Select the first expense from the drop down list under ‘Expenses Category’. Next under ‘Expense item’ click the down arrow to select the type of item which can be claimed in this category. For example, if you have selected ‘Accommodation’ as an expense category, you could select ‘Hotel accommodation’ as an expense item.
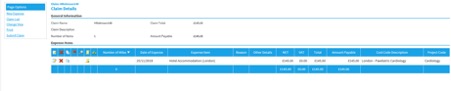
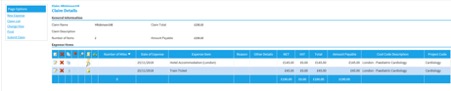
All expenses claimed require a receipt; except mileage and detour mileage. Enter a figure into the ‘Number of nights’ box and click ‘Yes’ to say you have a receipt. Then add the total from the receipt and click on save. You can add in a separate charge for breakfast if this wasn’t included in your room rate, as long as you have receipts and the total is within the £120/£150 limit. The accommodation expense is complete and the screen below is created. The system has created a claim name which is the unique claim reference. To add your accommodation receipt, click on the scroll icon which is in the sixth column from the left.
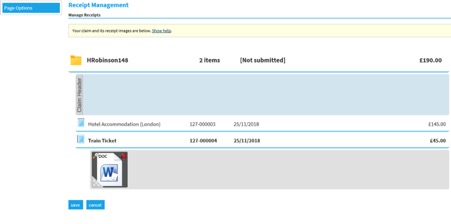
You will then see the ‘Receipt Management’ screen as below. Hover over the grey panel (to the left) and the scroll icon will appear. Click on the scroll icon to open a window showing the drives/folders on your device. Select the folder where you have saved your receipt image and click on the image to upload it to your claim.
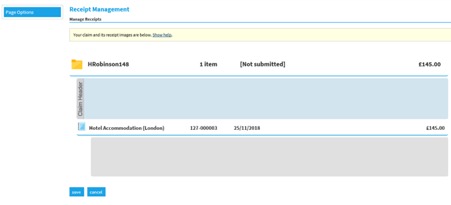
Click on ‘Save’. The scroll icon now has a magnifying glass under it and the receipt can be viewed.

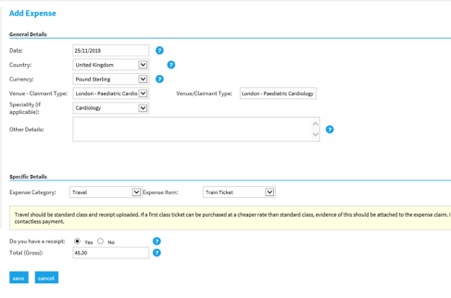
4) Adding a further expense item - train example
To add another expense, click on ‘New Expense’ from the list on the left side of the screen. Once again the ‘Add expense’ screen will appear as below. Under ‘Specific Details’ select the expense category and then the expense item from the drop down lists. For example, you would select ‘Travel’ as the category and ‘Train ticket’ as the item. Click ‘Yes’ to say you have a receipt and enter the value of the train ticket. Click to save the details of the expense.
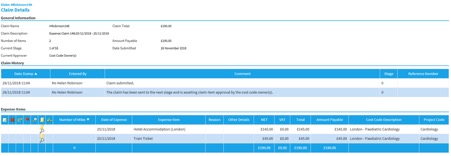
On the claim details screen as below, you should now see two expense items. You now need to add the receipt for the train ticket. Click on the scroll icon in the train ticket row to open the receipt management screen.
On the receipt management screen, hover over the grey panel (to the left) and the scroll icon will appear. Click on the scroll icon to open a window showing the drives/folders on your device. Select the folder where you have saved your receipt image and click on the image to upload it to your claim. The example below shows the added receipt as a Word document.
5) Completing and submitting your claim
Your claim will not be checked, approved and paid until you submit it. Click on ‘Submit Claim’ in the left hand menu when your expenses claim is complete. The following message will appear showing the claim number and description.
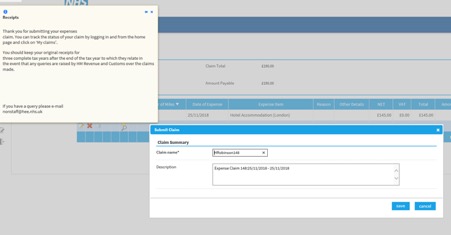
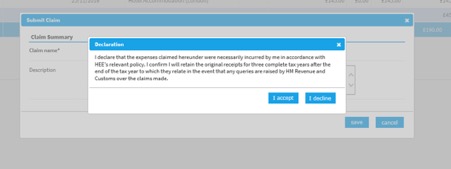
Click save and the ‘Declaration’ window appears. Read the declaration and click the ‘I Accept’ button.
6) After your claim has been submitted
Once submitted, your claim will move from the ‘Current claims page’ to your ‘Submitted claims page’. You will find this under Home/My Claims.
On the submitted claims page you will see a list of claims still waiting for payment, and currently with the HEE checkers and approvers. You can click into any of these claims to view information about what is happening with your claim.

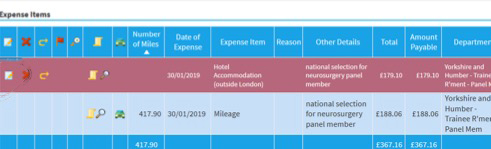
The claims history details will be above the list of your expense items.
If your checkers and approvers do not have any questions or issues with your claim, you will receive an email once the claim has been approved for payment in the system. We make a number of BACs payments a week, so you should receive payment into your account in no more than 7 working days after the notification email. Once a claim has been paid it will appear in your ‘Previous Claims’ page for future reference.
7) Returned expense claims
If an expense item is disputed and returned, you will receive an e-mail notification explaining what action you need to take. If you have not corrected or deleted an item before 28 days from the date the claim was rejected, the item will be deleted from your claim. This will ensure the remainder of your claim can progress to be paid. If the whole of your claim is incorrect, it will be unsubmitted and returned to your ‘Current Claims’ page. Again you will receive an email and will need to amend and resubmit if applicable.
If you have returned items, those items will be in red on your claim. You will need to edit the item and re-save it in order to return it to the person checking it. Once you’ve corrected this it will no longer be red. Please note that if you are only attaching a receipt using the Scroll icon, you will still need to edit and re-save to move the claim back.